You've just handed a kid a ruler and a worksheet, and they're staring at it like it's written in ancient Greek. Honestly, I've seen PhD students sweat less than a fifth-grader trying to measure a pencil line. The problem isn't the kid—it's that most science worksheet measurement activities are about as engaging as watching paint dry. We've all been there, and it's exhausting.
Here's the thing: measurement is the foundation of every single experiment they'll ever do. If they can't read a graduated cylinder or figure out why their data is wonky, they'll hit a wall by sixth grade. Right now, you're probably hunting for something that actually clicks—not another packet of boring diagrams. You need material that makes them argue about millimeters and laugh at their own estimation mistakes. That's where real learning happens.
Look—the secret isn't more worksheets. It's the right ones. What if I told you there's a way to turn that groan into a "wait, let me try that again"? I've got a stack of strategies that ditch the fluff and get straight to what works. Keep reading, and you'll walk away with exactly what you need to make measurement stick. No fluff, no fairy dust—just stuff that actually works.
Let's be honest: most measurement worksheets are about as exciting as watching paint dry. They hand kids a ruler, ask them to measure a line to the nearest inch, and call it a day. That approach misses the entire point. Measurement is not about reading numbers off a tool. It's about understanding scale, precision, and the physical reality of the world. A good worksheet should force a student to think about why we measure something a certain way, not just how.
The Part of Measurement Practice Most People Get Wrong
Here's what nobody tells you: the best measurement worksheets don't start with a ruler. They start with a question. I've watched countless students freeze up when asked to measure the length of a pencil because they haven't internalized what "length" actually means in a physical sense. They can count tick marks but can't tell you if their answer makes sense. That's a failure of design, not a failure of the student. A strong worksheet builds estimation skills first, then confirms with precise measurement. It creates a feedback loop where the student guesses, checks, and adjusts their mental model.
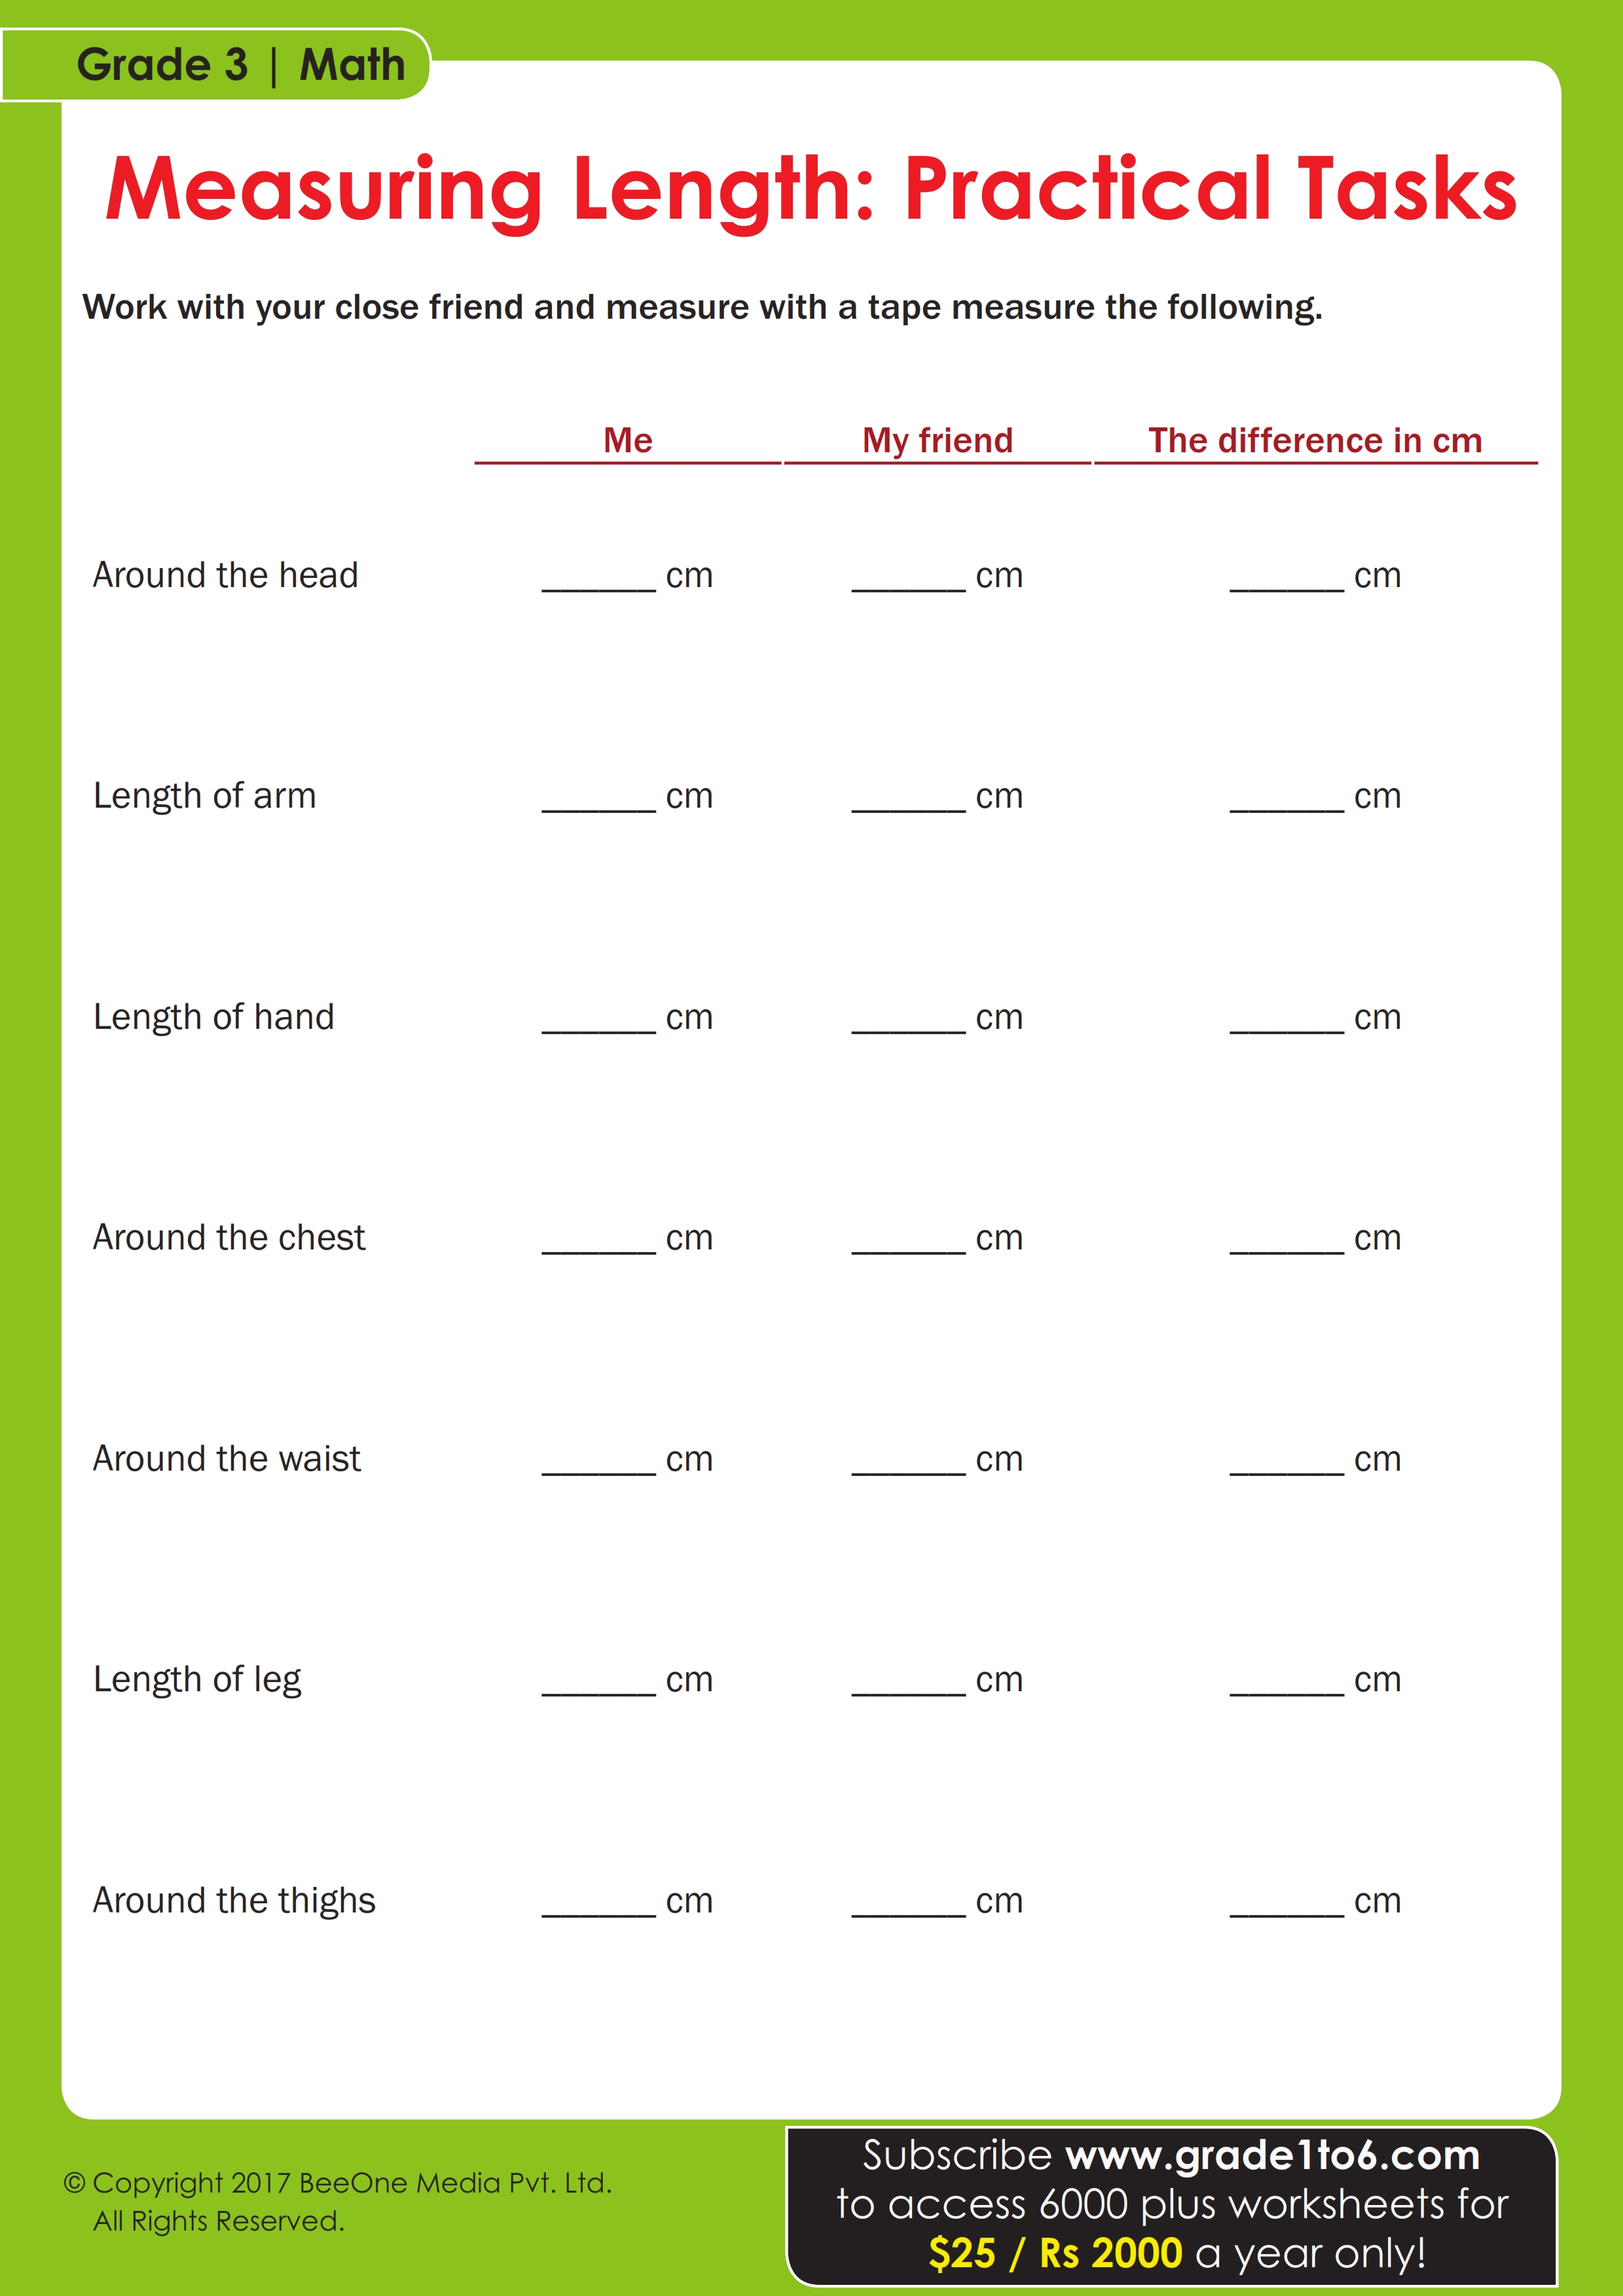
Take something as simple as measuring the width of a desk. A weak worksheet says "measure the desk in centimeters." A strong one says "estimate the width first, then measure. Was your estimate off by more than 10%? If so, why?" That single twist turns a rote task into a critical thinking exercise. The best materials I've seen layer in real-world context—measuring ingredients for a recipe, figuring out if a bookshelf will fit in a corner, or comparing the mass of different objects using a balance scale. The keyword here is context. Without it, you're just training kids to be human rulers, not thinkers.
Why Precision Matters More Than You Think
Precision is where most measurement practice falls apart. Students routinely report a measurement like "5.32 cm" when their tool only marks whole centimeters. That's not careful work—it's guessing. A quality exercise forces students to match their precision to the tool they're using. If a ruler has millimeter marks, you report to the nearest millimeter. If it only has inch marks, you don't pretend you measured to the sixteenth. This distinction matters enormously in fields like carpentry, engineering, and even cooking. A tablespoon is not a teaspoon, and pretending otherwise leads to bad results.
Building a Logical Sequence for Skill Development
I've seen worksheets throw metric and imperial systems at kids simultaneously, and it always ends in confusion. A better approach is a deliberate progression. Start with non-standard units—paperclips, hand spans, footsteps—to build the concept of "unit." Then introduce standard units for length, followed by mass and volume. Finally, bring in tools like graduated cylinders and spring scales. Each step should take about a week of practice, not a single worksheet. The table below shows a realistic sequence I've used successfully with upper elementary students.
| Stage | Focus | Sample Activity | Typical Duration |
|---|---|---|---|
| 1 | Non-standard units | Measure desk width in hand spans | 3-4 days |
| 2 | Standard length (metric) | Measure objects to nearest cm | 5 days |
| 3 | Standard mass | Compare object masses using balance | 4 days |
| 4 | Volume and liquid measure | Read graduated cylinder to nearest mL | 5 days |
| 5 | Mixed review with estimation | Estimate then measure 10 classroom items | 3 days |
One Specific Tip That Changes Everything
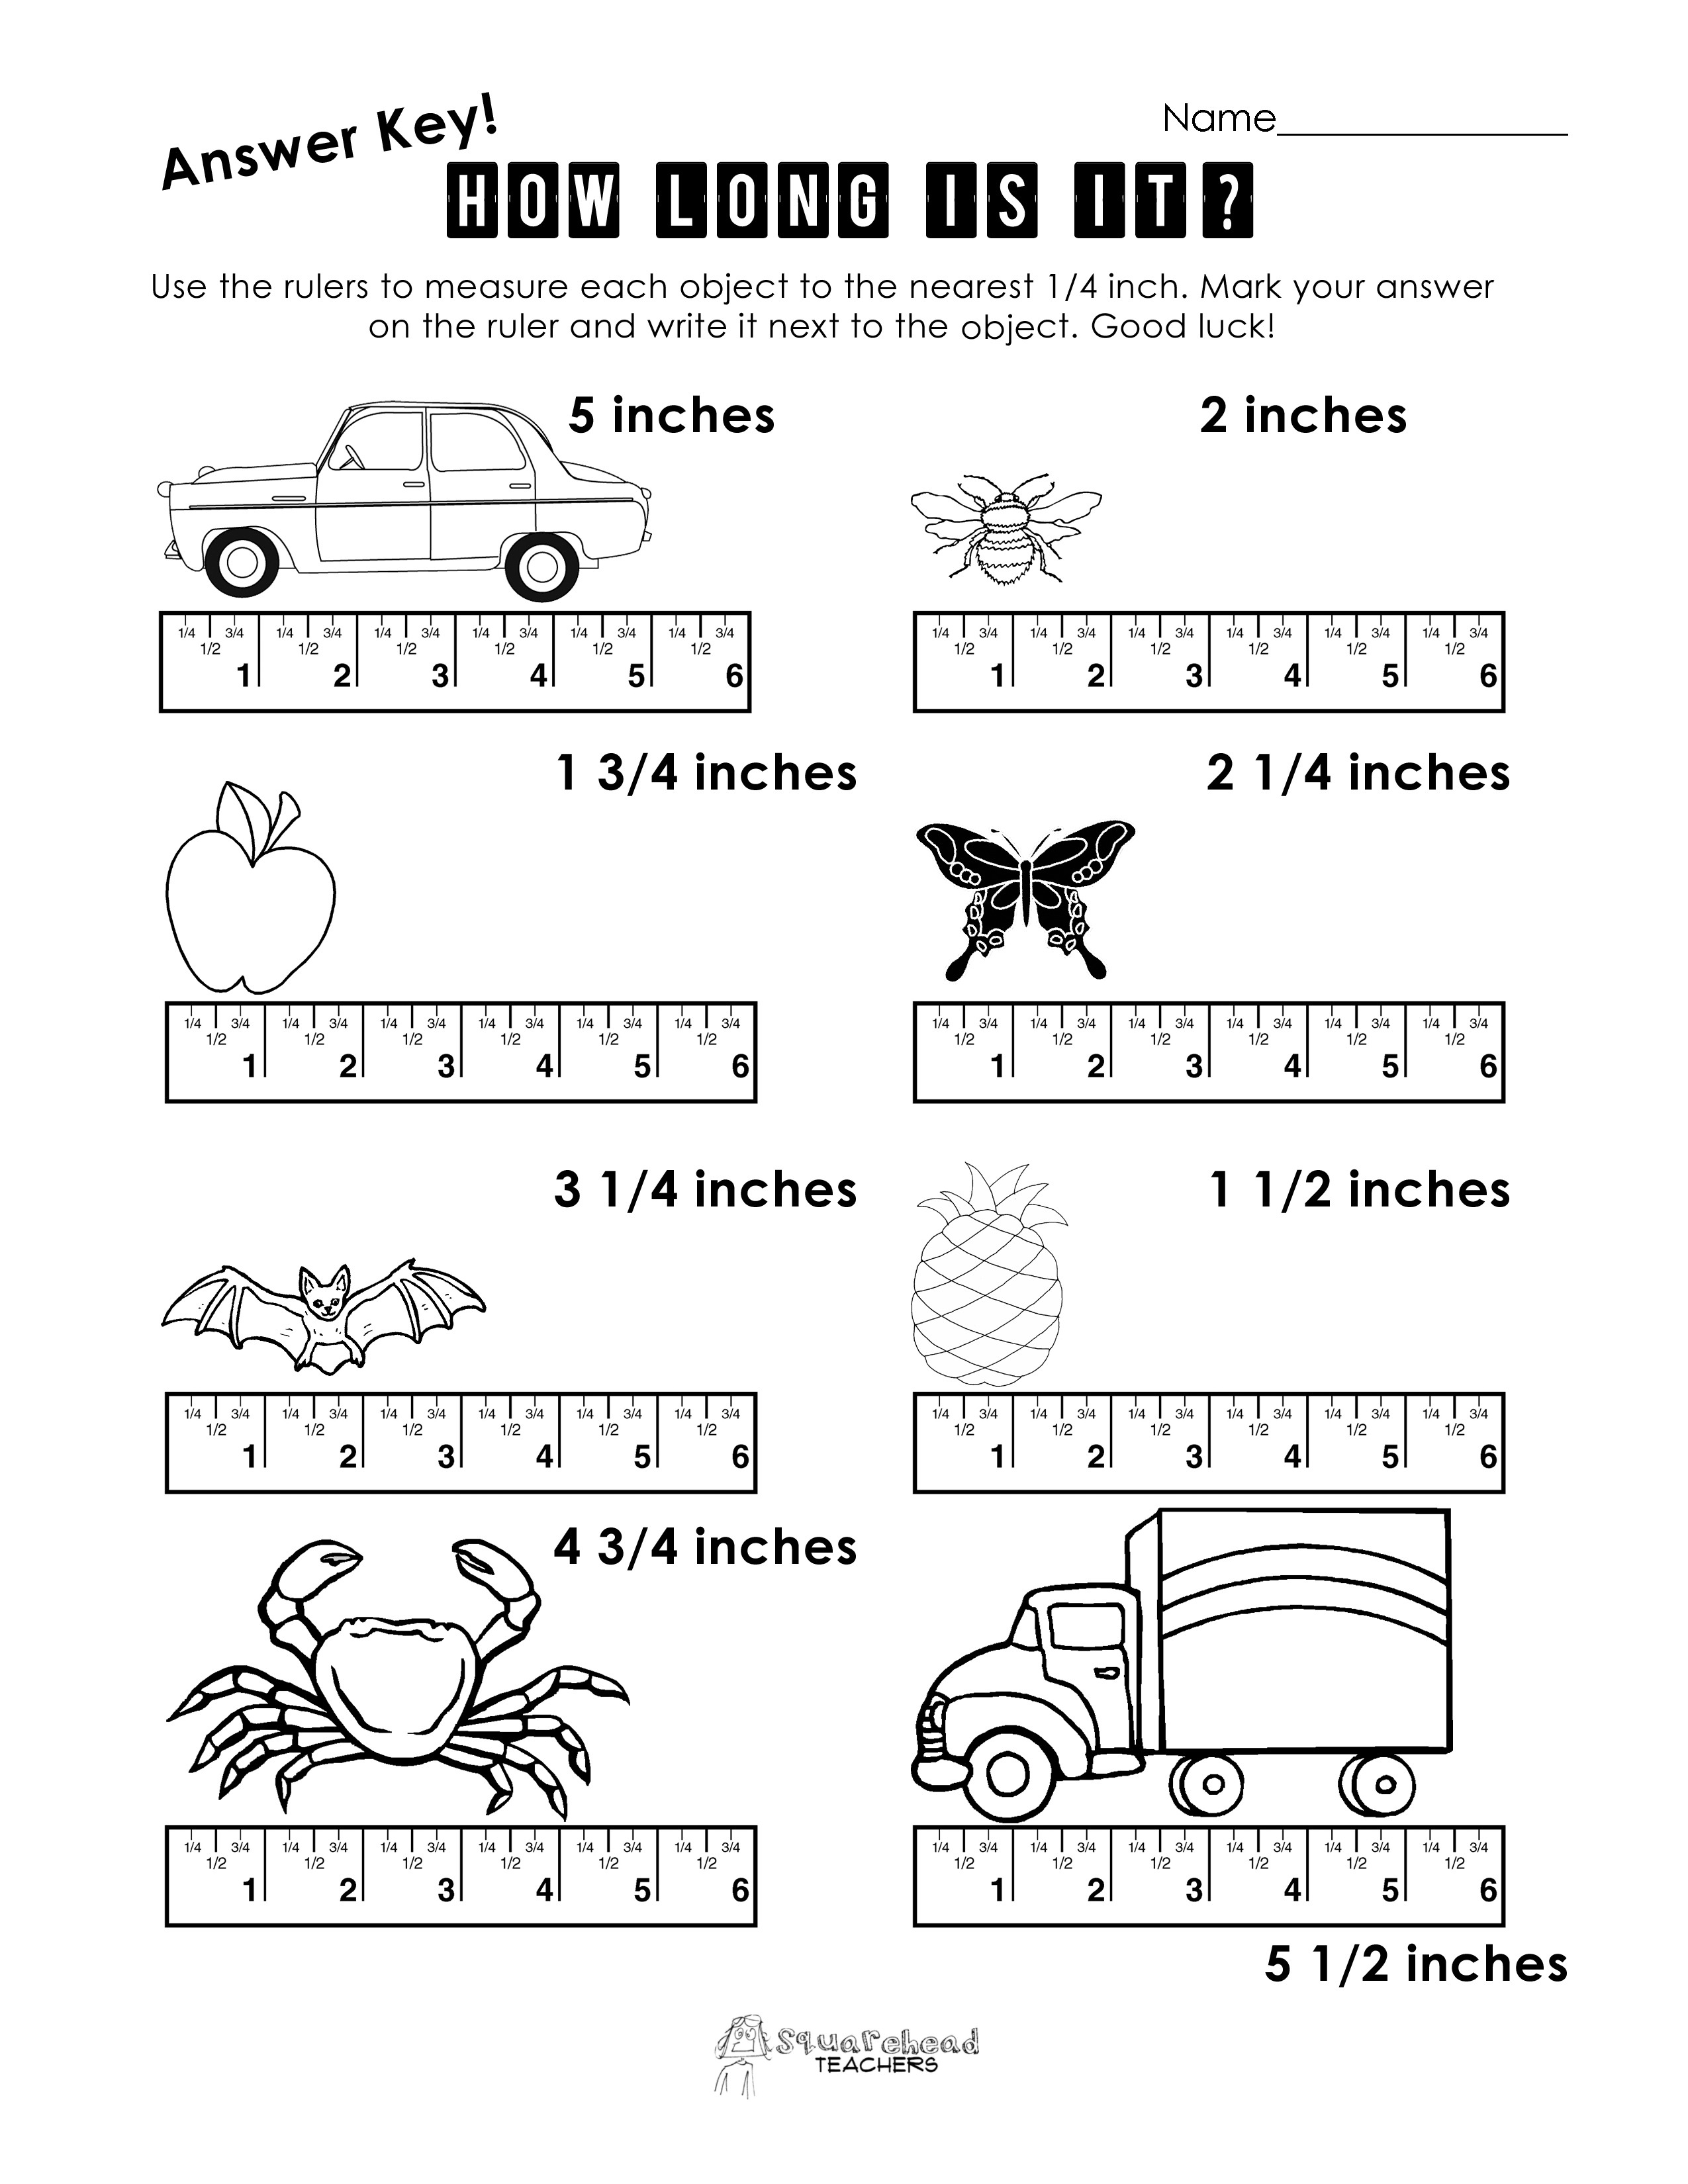
Here's the actionable tip that separates decent measurement work from great work: always include a "wrong answer" trap. For example, give students a picture of a ruler with the object starting at the 1 cm mark instead of the 0 mark. Many kids will just read the number at the end and call it the measurement. A worksheet that specifically tests for this common error—and then discusses why it matters—builds genuine understanding. I've seen fourth graders go from blindly copying numbers to catching their own mistakes in under two sessions. That's the real value of thoughtful measurement practice. It's not about getting the right number. It's about knowing why it's the right number.
One Last Thing Before You Go
Measurement isn't just a school subject—it's the quiet language of how we understand the world. Every time you adjust a recipe, estimate how much paint you need for a wall, or help a child figure out if a toy will fit on a shelf, you're using the same thinking that makes a science worksheet measurement activity click. This skill isn't about filling in blanks; it's about building confidence in observation, precision, and logic. When a child learns to measure well, they aren't just learning science—they're learning how to trust their own eyes and tools. That trust carries into everything from building a model rocket to budgeting their allowance.
Maybe you're wondering if you have the time or materials to make this stick at home. Let me ease that worry right now. You don't need a lab coat or expensive equipment. A ruler, a cup of water, and a curious afternoon are enough. The hesitation you feel is just the voice that says "I need to do this perfectly," but perfection isn't the point—connection is. Even a messy experiment where the water spills teaches something valuable. You already have everything you need to start.
Before you close this tab, consider bookmarking this page for the next rainy afternoon. Or better yet, share it with a teacher friend or a fellow parent who's been looking for a fresh way to make measurement real for their kids. The best resources are the ones that get used, not just saved. So take that first step: browse the gallery of activities, pick one that makes you smile, and let the learning happen naturally. Your next great teaching moment is just a measurement away.